A tutorial showing you the options to set up this new GA feature
When Google Analytics launched in 2005 it democratised web analytics with its feature rich offering, since then Google has worked hard to add new features to a product that is now considered a viable alternative to most enterprise level web analytics tools. But until recently GA lacked a key feature that many of it’s competitors have had since the first half of the last decade, that is the ability to group content at the session level.
Grouping content has lot's of applications, for retail sites grouping categories and products is important, for media sites, different types of stories and today all businesses need to know which types and formats of content are supporting their content marketing.
Other tools around the time of Google Analytics’ launch, such as HBX, dealt with this very well but Google, with its URL based content reports and lack of segmentation couldn’t deal with it without some rather involved configuration at the account level.
Other options for grouping content in Google Analytics
Although, it has always been possible to group content at the page view level by using the content drilldown feature or report filter in what is now the ‘All Pages’ report, this isn’t terribly helpful because the base metric used is page views (or worse still, unique page views) and trying to establish content popularity based on page views instead of sessions or visitors is like declaring that a minor celebrity has a high-profile based on the total number of column inches written about him or her as opposed to the total number of people doing the actual writing; it’s not wholly inaccurate but you can do a great deal better.
There are other workarounds that employ either advanced segmentation, custom variables, event tracking or goals but they each have their different advantages and disadvantages which arise from them not being specifically built for this purpose:
- Advanced segments afford a greater degree of analytical control and flexibility but for non premium GA users they are subject to the vagaries of GA’s sampling so making the data flimsy in some situations.
- Goals are more accurate in context of data output but they are limited to a single metric - that being sessions.
So with the introduction of content grouping in December 2013 it seemed as though the problem was resolved but indeed, though very good, Content Grouping is not without its own limitations.
To begin with you will find the option to configure Content Grouping at the ‘View’ level of the Admin section in GA. Here you will immediately notice the main flaw, namely that only a maximum of five content groups that can be configured (ten would be a better number), that means you will need to be judicious in deciding which content to group. That said, you can create sub-categories in each group so all is not lost.
Which content should you group?
This depends on the kind of site you have, broadly speaking there are two options, either by page type or based on the nature of the content itself.
If you’re running an e-commerce site then you might prefer to group content by page type e.g. list page, product details page etc. In most cases this will better reflect the customer journey and do more to help you understand the level of engagement at each of the key steps in the on-site customer journey.
If you run a publishing site or similar you may prefer to group content by subject matter since page type may be less relevant e.g. news, weather, etc. The main issue here is that there will doubtless not be enough content groups to cover off all the areas you would want to group so you would have to be clear about which are the most important areas of content - maybe there will be a way in which several areas can be rolled into one content group.
How to set up content grouping
The content groups themselves can be configured in different ways. There are three configuration options:
- 1. Using the tracking code
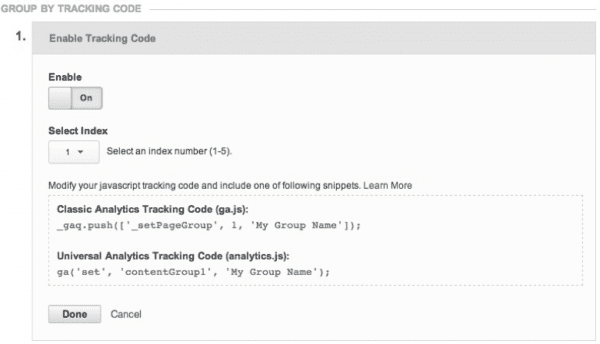
- 2. ‘Extraction’
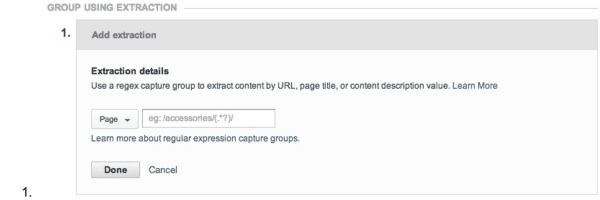
- 3. A set of rules definitions

It is possible to configure the content groupings using one or more of these options and you will need to consider each according to your site.
- You may prefer to use the tracking code option if you have a set of content that has a URL structure which doesn’t change or is the same as the URL structure in other parts of the site.
- You may prefer to use the extraction method if you simply want to group content according to a folder within a URL. Here, you may need to have a basic understanding of how Google Analytics uses regular expressions in order to maximise this.
- You may prefer to use a set of rules definitions if you need to apply a slightly more complex filtering process e.g. instances where you may wish to include content that includes one element of a URL but not another.
The benefit of the second and third options is that they don’t require any changes to be made to the GA tracking code and so there is no dependence on developer time. On the other hand if your GA code is managed by a tag management system (see the Smart Insights guide to tag management) this will be less of an issue.
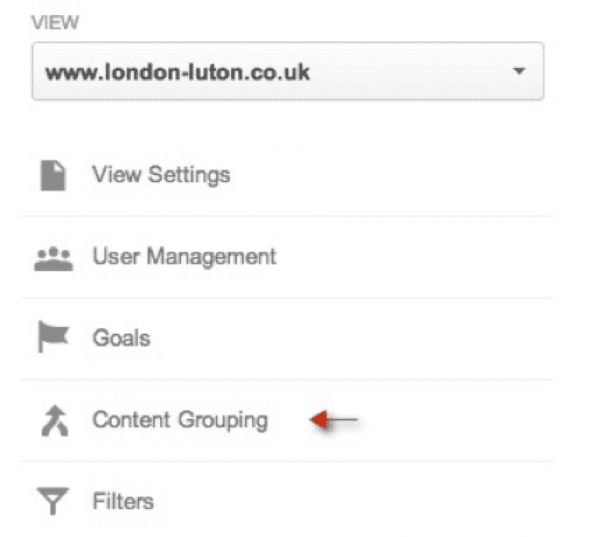
To access the configuration area from your GA reporting UI click on the ‘Admin’ button in the top right. Under the ‘View’ section on the far right select ‘Content Grouping’
and from here you will then be presented with the three configuration options shown above.
...don’t forget…
When setting up Content Groups you should remember that like goals, data is only collected from that point onwards, in other words it isn’t collected retrospectively.
You should also remember that while you can switch Content Groups on and off you cannot delete them. You can however edit them but if you do this in such a way that they start tracking different content or the same content with a different URL element (perhaps after a site rebuild or redesign) then you should make a note in Google Annotations on the day that you made the configuration change to help remind yourself why the data output might have changed. This last point is particularly important because if there is no recollection of the change being made it could cause a great deal of pain and wasted time when running an analysis that crosses over the date when the change was made.
What happens next?
Once you’ve set up your content groups and data begins to be aggregated within them there are a couple of ways which you can view the data.
- 1. Go to the All pages report in the ‘Behaviour’ reporting menu. Behaviour > Site Content > All Pages. Here you will see the normal report but you will also notice that Content Grouping is now presented as a new Primary Dimension offering. by clicking on the drop down you can then select the content group you’d like to view.
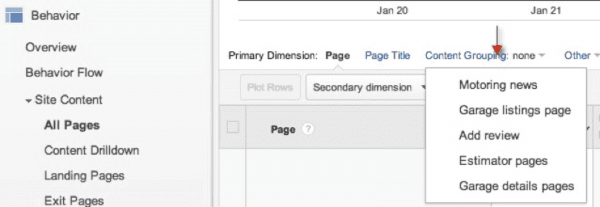
- 2. An alternative and more powerful option would be to create a custom report using the content groups.
Content Groups + custom reports = better insight.
The main problem with the standard Content Grouping reports in that the primary reporting metric is page views or unique page views, this is at odds with the primary reporting metric for most sites which is usually sessions. Because of that it’s not really possible to calculate conversion to a specific content group using these two different metrics. The solution is to create a custom report.
Creating custom reports
If you’ve used up all five content groups then you will be best off creating one tab for each content group in your custom report. The example below shows this.
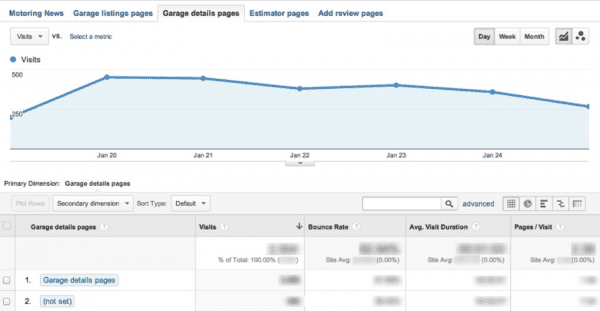
You can then apply the metrics for each group, beware that there are some limitations in terms of which metrics you can use and you will not necessarily know which metrics this applies to until you’ve viewed the report and seen whether or not data has populated, but as an initial indicator some revenue metrics will not work. Page value should be fine if you have an e-commerce site.
You can then use the various charting functions to interpret the data and draw your own insights from it.
In summary, to use content groups I recommend you:
1. Identify which types of content you want to group.
2. Configure your content grouping in the admin area under the ‘View’ section.
3. Wait a few days or weeks to gather enough data.
4. Create a custom report to help in analysing your new data.


